Multiple Nightscout instances on a V-Server without Docker/Container/LXC
This guide was translated using Google Translate and may contain translation errors.
I beg your pardon.
How can you „uncomplicatedly“ install multiple Nightscout instances on a V-Server?
For a long time I tried to get several Nightscout instances running on a V-Server.
In the common communities, Docker, Docker Compose and container visualization have always been used.
Not so easy as a beginner or as a container/docker newbie. But it also works without Docker/Container.
In this tutorial I will show you my way of realizing how to install multiple instances on a V-Server without Docker. This only requires a small change to Nightscout.
Of course, it is cumbersome for experienced Docker users, but for me it is a simple alternative if the server is used exclusively for Nightscout.
Everyone who uses this guide acts on their own responsibility.
Required material:
Nightscout -> https://github.com/nightscout/cgm-remote-monitor
Putty -> https://www.putty.org/
Programmers Notepad -> https://www.pnotepad.org/
Filezilla or other FTP Programm -> https://filezilla-project.org/
Any V-Server mit Ubuntu 20.04 LTS.
For this tutorial I used a VPS R8 from 1blu.de.
First we log in with Putty on the server with the root user. In the entire guide I assume a new installation of the server.
Apache 2 uninstall
The Apache2 Service stop:
sudo service apache2 stop
perform uninstallation:
sudo apt-get purge apache2 apache2-utils
If necessary, delete existing occurrences:
sudo rm -rf /etc/apache2
sudo rm -rf /usr/sbin/apache2
sudo rm -rf /usr/lib/apache2
sudo rm -rf /etc/apache2
sudo rm -rf /usr/share/apache2
sudo rm -rf /usr/share/man/man8/apache2.8.gz
Check whether Apache files and directories are still on the server
whereis apache2
Update Ubuntu and install required components
apt update
apt upgrade
apt install ufw
apt install nginx
apt-get install nano
apt install python
apt install gcc
Mongo Database install
apt install mongodb
Mongo DB Status check
$ systemctl status mongodb
Output should look like this:
● mongodb.service – An object/document-oriented database
Loaded: loaded (/lib/systemd/system/mongodb.service; enabled; vendor preset: enabled)
Active: active (running) since Tue 2022-09-20 18:27:57 UTC; 21s ago
In this guide I will install 3 Nightscout instances for illustration.
Even more are possible, but the V-Server should also have enough power.
I have not tested how many are actually stable and performant.
Theoretically, at least 10 instances should be possible with my V-Server compared to the Raspberry Pi1b.
Mongo Database create
We directly create all databases that are required.
First Database:
$ mongo

> use Nightscout

> db.createUser({user: "mainuser", pwd: "passwort", roles:["readWrite"]})

> quit()
Second Database:
$ mongo

> use Nightscout2

> db.createUser({user: "mainuser2", pwd: "passwort", roles:["readWrite"]})

> quit()
Third Database:
$ mongo

> use Nightscout3

> db.createUser({user: "mainuser3", pwd: "passwort", roles:["readWrite"]})

> quit()
Remember/write down database names and passwords!
Create first user and first instance
adduser mainuser
usermod -aG sudo mainuser

su mainuser

grep '^sudo' /etc/group
Install and set up Node JS
sudo apt install nodejs

sudo apt install build-essential checkinstall

sudo apt install libssl-dev

wget -qO- https://raw.githubusercontent.com/creationix/nvm/v0.33.8/install.sh | bash
– restart Console – login with mainuser –
source /etc/profile

$ nvm ls-remote

$ nvm install 14.18.1

$ nvm list

$ nvm use 14.18.1

sudo apt install npm
Check which directory you are in:
$ pwd
> /home/mainuser
If not in the home/mainuser directory
§ cd /home/mainuser
Download Nightscout from Github and upload it to the server.
First download Nighscout files on GitHub as a zip file: https://github.com/nightscout/cgm-remote-monitor

Unpack the downloaded directory on the PC.
Open FTP program (Filezilla) and connect to server.
Login to server with root.
Change to /home/mainuser in the FTP directory and upload the unzipped Nightscout folder to the /home/mainuser directory.
Give the Nightscout directory „cgm-remote-monitor-master“ chmod 777.
If everything has uploaded correctly, switch back to Putty.
Switch to the Nightscout directory and run the installation.
$ cd cgm-remote-monitor-master
$ npm install
Wait for installation to complete
Nightscout configuration
Adjust Mongo access data and Api-Secret!
$ nano start.sh -> inhalt einfügen
#!/bin/bash
# environment variables

export DISPLAY_UNITS="mg/dl"

export MONGO_CONNECTION="mongodb://mainuser:passwort@localhost:27017/Nightscout"

export BASE_URL="127.0.0.1:1337"

export API_SECRET="12-digit-code"

export PUMP_FIELDS="reservoir battery status"

export DEVICESTATUS_ADVANCED=true

export ENABLE="careportal loop iob cob openaps pump bwg rawbg basal cors direction timeago devicestatus ar2 profile boluscalc food sage iage cage alexa basalprofile bgi directions bage upbat googlehome errorcodes reservoir battery openapsbasal"

export TIME_FORMAT=24

export INSECURE_USE_HTTP=true

export LANGUAGE=de

export EDIT_MODE=on

export PUMP_ENABLE_ALERTS=true

export PUMP_FIELDS="reservoir battery clock status"

export PUMP_RETRO_FIELDS="reservoir battery clock"

export PUMP_WARN_CLOCK=30

export PUMP_URGENT_CLOCK=60

export PUMP_WARN_RES=50

export PUMP_URGENT_RES=10

export PUMP_WARN_BATT_P=30

export PUMP_URGENT_BATT_P=20

export PUMP_WARN_BATT_V=1.35

export PUMP_URGENT_BATT_V=1.30

export OPENAPS_ENABLE_ALERTS=false

export OPENAPS_WARN=30

export OPENAPS_URGENT=60

export OPENAPS_FIELDS="status-symbol status-label iob meal-assist rssi freq"

export OPENAPS_RETRO_FIELDS="status-symbol status-label iob meal-assist rssi"

export LOOP_ENABLE_ALERTS=false

export LOOP_WARN=30

export LOOP_URGENT=60

export SHOW_PLUGINS=careportal

export SHOW_FORECAST="ar2 openaps"
# start server

/home/mainuser/.nvm/versions/node/v14.18.1/bin/node server.js
Exit with ctrl+c and confirm the save with Y.
Give the start.sh required rights:
$ chmod 775 start.sh
Then test the start.sh.
./start.sh
If start.sh is running correctly, the last message that appears in green is „WS:…“.
With ctrl+c we end the display.
Nightscout Service set up
$ sudo nano /etc/systemd/system/nightscout.service
copy and paste:
[Unit]

Description=Nightscout Service

After=network.target
[Service]

Type=simple

WorkingDirectory=/home/mainuser/cgm-remote-monitor-master

ExecStart=/home/mainuser/cgm-remote-monitor-master/start.sh
[Install]

WantedBy=multi-user.target
Save and exit with: „ctrl+X“ – „Y“ – „enter“
Reload systemd:
$ sudo systemctl daemon-reload
Nigtscout Service activation and startup:
$ sudo systemctl enable nightscout.service
$ sudo systemctl start nightscout.service
Nightscout Service Status check:
$ sudo systemctl status nightscout.service
Output:
[…] Active: active (running)
Assign domain to host
Enter main domain and all subdomains for all instances in the host file.
$ sudo nano /etc/hosts

Save with „ctlr+X“ – „Y“ – „enter“
Nginx config (Virtual Host) set up
First we create a config for the main domain and then for the first instance (we’ll take care of the other instances later).
Configure main domain (enter server_name)
sudo nano /etc/nginx/sites-available/domain.de.conf
Copy and paste:
server {
root /var/www/html;
server_name domain.de;
server_name www.domain.de;
location / {

try_files $uri $uri/ =404;

}
}
ctrl+x and „y“ to save
Configuration aktivation:
sudo ln -s /etc/nginx/sites-available/domain.de.conf /etc/nginx/sites-enabled/
Default config delete:
cd
cd /etc/nginx/
sudo rm sites-available/default
sudo rm sites-enabled/default
cd
Set up a subdomain including port forwarding.
sudo nano /etc/nginx/sites-available/ns1.domain.de.conf
Copy and paste:
server {

listen 80;
server_name ns1.domain.de;
server_name www.ns1.domain.de;
location / {
proxy_pass http://127.0.0.1:1337;
proxy_set_header Upgrade $http_upgrade;
proxy_set_header Connection "upgrade";
proxy_set_header X-Forwarded-Proto "https";
}

}
Configuration aktivation
sudo ln -s /etc/nginx/sites-available/ns1.domain.de.conf /etc/nginx/sites-enabled/
nginx restart
sudo service nginx restart
Check Nginx running correctly
systemctl status nginx
Logout, Login with Root Account
Set up a second user and grant sudo rights
adduser mainuser2

usermod -aG sudo mainuser2

su mainuser2
grep '^sudo' /etc/group
Node JS set up
sudo apt install nodejs

sudo apt install build-essential checkinstall

$ sudo apt install libssl-dev

wget -qO- https://raw.githubusercontent.com/creationix/nvm/v0.33.8/install.sh | bash
– restart console – login with mainuser2 –
source /etc/profile

$ nvm ls-remote

$ nvm install 14.18.1

$ nvm list

$ nvm use 14.18.1
Check directory:
$ pwd
> /home/mainuser2
If not in the home/mainuser2 directory
§ cd /home/mainuser2
Install Nightscout instance 2
Go to the unzipped Nightscout folder on the PC, change to the lib->server directory.
Here is a file called „env.js“.

Open the file env.js with Programmer’s Notepad and change the port in line 36.
(Ports in the range 32768 – 65535 should be freely available.)
In this guide, I use port 36363 for the second installation.

Save the file after changing the port.
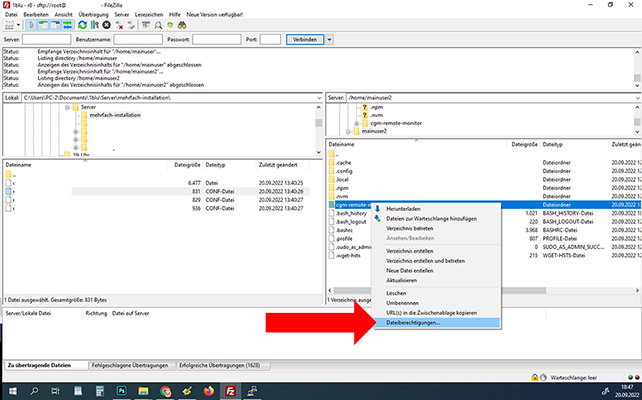
FTP login to server with root.
Switch to the FTP directory /home/mainuser2 and upload the Nightscout folder to the server.
Chmod 777 to the Nightscout directory before installation

Back to Putty
Change to the Nightscout directory
$ cd cgm-remote-monitor-master
Installation start
$ npm install
Wait until the installation is complete, then edit the start.sh.
$ nano start.sh
-> copy and paste
#!/bin/bash
# environment variables

export DISPLAY_UNITS="mg/dl"

export MONGO_CONNECTION="mongodb://mainuser2:passwort@localhost:27017/Nightscout2"

export BASE_URL="127.0.0.1:36363"

export API_SECRET="12-digit-code"

export PUMP_FIELDS="reservoir battery status"

export DEVICESTATUS_ADVANCED=true

export ENABLE="careportal loop iob cob openaps pump bwg rawbg basal cors direction timeago devicestatus ar2 profile boluscalc food sage iage cage alexa basalprofile bgi directions bage upbat googlehome errorcodes reservoir battery openapsbasal"

export TIME_FORMAT=24

export INSECURE_USE_HTTP=true

export LANGUAGE=de

export EDIT_MODE=on

export PUMP_ENABLE_ALERTS=true

export PUMP_FIELDS="reservoir battery clock status"

export PUMP_RETRO_FIELDS="reservoir battery clock"

export PUMP_WARN_CLOCK=30

export PUMP_URGENT_CLOCK=60

export PUMP_WARN_RES=50

export PUMP_URGENT_RES=10

export PUMP_WARN_BATT_P=30

export PUMP_URGENT_BATT_P=20

export PUMP_WARN_BATT_V=1.35

export PUMP_URGENT_BATT_V=1.30

export OPENAPS_ENABLE_ALERTS=false

export OPENAPS_WARN=30

export OPENAPS_URGENT=60

export OPENAPS_FIELDS="status-symbol status-label iob meal-assist rssi freq"

export OPENAPS_RETRO_FIELDS="status-symbol status-label iob meal-assist rssi"

export LOOP_ENABLE_ALERTS=false

export LOOP_WARN=30

export LOOP_URGENT=60

export SHOW_PLUGINS=careportal

export SHOW_FORECAST="ar2 openaps"
# start server

/home/mainuser2/.nvm/versions/node/v14.18.1/bin/node server.js
ctrl+c ->with „Y“ Save and exit
Change file permissions of start.sh:
$ chmod 775 start.sh
Then run start.sh once:
./start.sh
If start.sh is running correctly, the last message that appears in green text is WS:…
With ctrl+c we end the display.
Set up night scout service
An independent nightscout2.service is set up so that the second installation can also run.
$ sudo nano /etc/systemd/system/nightscout2.service
copy and paste:
[Unit]

Description=Nightscout2 Service

After=network.target
[Service]

Type=simple

WorkingDirectory=/home/mainuser2/cgm-remote-monitor-master

ExecStart=/home/mainuser2/cgm-remote-monitor-master/start.sh
[Install]

WantedBy=multi-user.target
Save and exit with: „ctrl+X“ – „Y“ – „enter“
Reload systemd:
$ sudo systemctl daemon-reload
Nigtscout2 Service activation and startup:
$ sudo systemctl enable nightscout2.service
$ sudo systemctl start nightscout2.service
Nightscout Service Status:
$ sudo systemctl status nightscout2.service
Output:
● nightscout2.service – Nightscout2 Service
Loaded: loaded (/etc/systemd/system/nightscout2.service; enabled; vendor preset: enabled)
Active: active (running)
[..]
Subdomain setup
sudo nano /etc/nginx/sites-available/ns2.domain.de.conf
copy and paste:
server {

listen 80;
server_name ns2.domain.de;

server_name www.ns2.domain.de;
location / {
proxy_pass http://127.0.0.1:36363;

proxy_set_header Upgrade $http_upgrade;

proxy_set_header Connection "upgrade";

proxy_set_header X-Forwarded-Proto "https";

}

}
Configuration activation and nginx restart
sudo ln -s /etc/nginx/sites-available/ns2.domain.de.conf /etc/nginx/sites-enabled/
sudo service nginx restart
Check if Nginx is running correctly
systemctl status nginx
Logout, Login with Root Account
Create third party user and instance
adduser mainuser3
usermod -aG sudo mainuser3
su mainuser3
grep ‚^sudo‘ /etc/group
Node JS Install
sudo apt install nodejs

sudo apt install build-essential checkinstall

$ sudo apt install libssl-dev

wget -qO- https://raw.githubusercontent.com/creationix/nvm/v0.33.8/install.sh | bash
– restart console – login with mainuser3 –
source /etc/profile

$ nvm ls-remote

$ nvm install 14.18.1

$ nvm list

$ nvm use 14.18.1
Check which directory you are in:
$ pwd
> /home/mainuser3
If not in the home/mainuser3 directory
§ cd /home/mainuser3
Git Copy/Clone
Switch back to the Nightscout folder on the PC and change the port of the env.js as in the second instance.
For the third installation I used port 36364.
FTP login to server with root.
Switch to the FTP directory /home/mainuser3 and upload the Nightscout folder to the server.
Nightscout directory chmod 777 assigned before installation (as with the second instance)
$ cd cgm-remote-monitor-master
$ npm install
Wait for Installation Complete (2-3 minutes)
$ nano start.sh -> copy and paste
#!/bin/bash
# environment variables

export DISPLAY_UNITS="mg/dl"

export MONGO_CONNECTION="mongodb://mainuser3:passwort@localhost:27017/Nightscout3"

export BASE_URL="127.0.0.1:36364"

export API_SECRET="12-digit-code"

export PUMP_FIELDS="reservoir battery status"

export DEVICESTATUS_ADVANCED=true

export ENABLE="careportal loop iob cob openaps pump bwg rawbg basal cors direction timeago devicestatus ar2 profile boluscalc food sage iage cage alexa basalprofile bgi directions bage upbat googlehome errorcodes reservoir battery openapsbasal"

export TIME_FORMAT=24

export INSECURE_USE_HTTP=true

export LANGUAGE=de

export EDIT_MODE=on

export PUMP_ENABLE_ALERTS=true

export PUMP_FIELDS="reservoir battery clock status"

export PUMP_RETRO_FIELDS="reservoir battery clock"

export PUMP_WARN_CLOCK=30

export PUMP_URGENT_CLOCK=60

export PUMP_WARN_RES=50

export PUMP_URGENT_RES=10

export PUMP_WARN_BATT_P=30

export PUMP_URGENT_BATT_P=20

export PUMP_WARN_BATT_V=1.35

export PUMP_URGENT_BATT_V=1.30

export OPENAPS_ENABLE_ALERTS=false

export OPENAPS_WARN=30

export OPENAPS_URGENT=60

export OPENAPS_FIELDS="status-symbol status-label iob meal-assist rssi freq"

export OPENAPS_RETRO_FIELDS="status-symbol status-label iob meal-assist rssi"

export LOOP_ENABLE_ALERTS=false

export LOOP_WARN=30

export LOOP_URGENT=60

export SHOW_PLUGINS=careportal

export SHOW_FORECAST="ar2 openaps"
# start server

/home/mainuser3/.nvm/versions/node/v14.18.1/bin/node server.js
Close with ctrl+c and confirm the save with „Y“.
Then give start.sh the appropriate access rights again.
$ chmod 775 start.sh
Run the start.sh once
./start.sh
If start.sh is running correctly, the last message that appears in green text is WS:…
With ctrl+c we end the display.
Set up Nightscout Service for a third instance
Next, a nightscout.service file must also be created for the third instance.
$ sudo nano /etc/systemd/system/nightscout3.service
Copy and paste:
[Unit]

Description=Nightscout3 Service

After=network.target
[Service]

Type=simple

WorkingDirectory=/home/mainuser3/cgm-remote-monitor-master

ExecStart=/home/mainuser3/cgm-remote-monitor-master/start.sh
[Install]

WantedBy=multi-user.target
Save and exit with: „Ctrl+X“ – „Y“ – „enter“
Reload systemd:
$ sudo systemctl daemon-reload
Activate and start Nigtscout3 service:
$ sudo systemctl enable nightscout3.service
$ sudo systemctl start nightscout3.service
Nightscout Service Status:
$ sudo systemctl status nightscout3.service
Output:
● nightscout3.service – Nightscout3 Service
Loaded: loaded (/etc/systemd/system/nightscout3.service; enabled; vendor preset: enabled)
Active: active (running)
[..]
Subdomain for third party
sudo nano /etc/nginx/sites-available/ns3.domain.de.conf
Copy and paste:
server {

listen 80;
server_name ns3.domain.de;

server_name www.ns3.domain.de;
location / {

proxy_pass http://127.0.0.1:36364;

proxy_set_header Upgrade $http_upgrade;

proxy_set_header Connection "upgrade";

proxy_set_header X-Forwarded-Proto "https";

}

}
Activate configuration and restart nginx.
sudo ln -s /etc/nginx/sites-available/ns3.domain.de.conf /etc/nginx/sites-enabled/
sudo service nginx restart
Check if Nginx is running correctly
systemctl status nginx
Logout and Login with Root Account
Install certbot nginx
If not already installed, install certbot-nginx:
sudo apt install certbot python3-certbot-nginx
Request SSL certificates
We’ll start with the main domain and then we’ll request the SSL_Certificates for the subdomains.
sudo certbot --nginx -d domain.de -d www.domain.de
Enter email address
With „A“ accept conditions
Advertising with N for no or J for yes
2 for automatic forwarding
sudo certbot --nginx -d ns1.domain.de -d www.ns1.domain.de
confirm with 2 forwarding
sudo certbot --nginx -d ns2.domain.de -d www.ns2.domain.de
confirm with 2 forwarding
sudo certbot --nginx -d ns3.domain.de -d www.ns3.domain.de
confirm with 2 forwarding
Certbot Timer Check:
sudo systemctl status certbot.timer
Renew test:
sudo certbot renew --dry-run
Configure and enable firewall
In the first step we give the firewall (UFW) the appropriate permissions/port releases.
ufw allow 1337

ufw allow 36363

ufw allow 36364

ufw allow 'Nginx Full'

ufw allow 27017

ufw allow OpenSSH
Firewall activation
ufw enable
Then check whether everything is correct as indicated above.
$ sudo ufw status
(View status and enabled ports)
Finished. 3 running Nightscout instances on one server without additional components like Docker, LXC or similar container services.
Update note:
If a new Nightscout version comes out, each instance must be updated individually.
Before an update, the start.sh and the modified env.js must be backed up!
The update instructions for Nightscout Updates installieren must be changed accordingly for the individual instances regarding the nightscout.service and the Nightscout directory.